Github Actions

Github Actions 란

엔드투엔드 깃허브 중심 SDLC 자동화 프로세스 : ‘딸깍’하면 GitHub가 자동으로 첨부터 끝까지 다 해줌”

프로젝트를 체계적으로 관리할 수 있고 그 과정을 통합하고 자동화해주는 플랫폼과 프레임워크는 원래 있었다. (Jenkins, CircleCI, Travis-CI 등..) 그리고 이런 툴로 SDLC 자동화를 구축 해주는건 국룰이었다.

2019년 깃헙에서도 SDLC 자동화를 지원해주는 Github Actions이 나왔다.

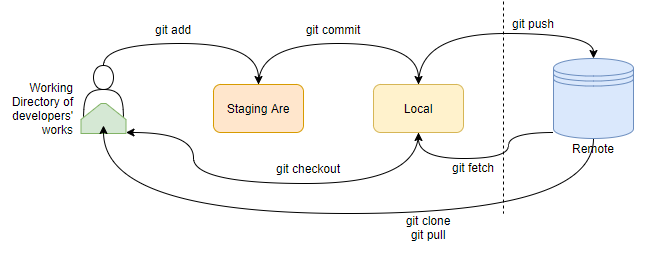
Github Actions를 쓰게 된다면 기존의 SDLC 툴과 달리 원격저장소와 완벽한 통합이 가능 하다는거다. 코드 저장소와 CI/CD가 같은 플랫폼에 있다보니 설정도 간단했고, 외에 GitHub의 형상관리 기능들(Issues, Projects, Security 등)을 활용할 수 있다는 것도 ㄹㅇ개꿀이다. 또한 Marketplace에서 다른 개발자들이 만든 Actions를 가져다 쓸 수 있어서 거의 모든 작업을 복붙 수준으로 구현할 수 있다.

예를 들어 AWS에 배포하고 싶다? 관련 Action 찾아서 쓰면 끝 Node.js 테스트하고 싶다? 테스트 Action 가져다 쓰면 끝!

이런 편의성 덕에 특히 작은 규모의 프로젝트나 오픈소스에서 아주 유용하게 쓰이고 있음.


Github Actions의 동작 과정

1.이벤트 발생 : git push 하거나 풀리퀘스트 생성 
2.Github가 `.github/workflows` 폴더를 뒤져서 해당 이벤트에 반응하도록 설정된 
workflow 파일을 찾아냄
3. `workflow` 에 정의 된 스크립트 실행

workflow 란?

자동화하고 싶은 작업의 절차이다.== pipeline
그 절차를 작성해 놓은 실행파일이 workflowfile이다.

workflow 구성

 job :
- 실행할 작업 단위
- 테스트, 빌드, 배포 등등 하고 싶은 일들을 job으로 정의
- 여러 job은 기본적으로 병렬로 실행됨 (순서 정할 수도 있음)


runner : 
- job을 실행하는 서버
- Github에서 제공하는 가상 머신
- 각 job마다 깨끗한 새 환경에서 시작함


step : 
- job 안의 실제 실행 단계
- 순차적으로 실행되는 명령어들
- marketplace의 action을 가져다 쓰거나 직접 명령어를 실행할 수 있음

workflowfile 예시

on:
  push:              # 코드가 push될 때
    branches: [main]
  pull_request:      # PR이 생성될 때
    branches: [main]
  schedule:          # 정해진 시간에
    - cron: '0 0 * * *'
  workflow_dispatch: # 수동으로 실행할 때		
 
#event는 workflow의 실행 조건을 정의할 수 있다.
Link to original

Github-Convention

종류설명사용 예시힙한 커밋 예시Emoji
feat새 기능 추가feat: login ✨ : login
fix버그 수정fix : systex error🐛 : systex error🐛
docs문서 수정docs : add api docs📚 : add api docs📚
refactor코드 리펙토링refactor : code is more cute📦: code more cute📦
perf성능 개선perf : Parallel processing in writer after removal of processor🚀:Parallel processing in writer after removal of processor🚀
test테스트 코드 추가test: add user service unit test code🚨: add user service unit test code🚨
build빌드 관련 시스템 수정build : webpack update🛠 : webpack update🛠
ci배포 자동화 관련ci : add jenkins pipeline⚙️:add jenkins pipeline⚙️
chore버전업뎃같은 잡다한거chore : package version update♻️ : package version update♻️
revert되돌리기revert : join() rollback🗑 : join() rollback🗑

이거보다 더 많이 있는데, 다 알 필요 없어서 주로 쓰이는 것만 작성함.

[Tip] : 한글로 써도 되지만 영어로 쓰는게 좀 더 간지난다.

Link to original

Github 개념

알고 쓰자 Github!

“아무 생각 없이 잘만 써오다가 갑자기 글을 쓰게 됨”

Github의 기본적인 소스 관리 기능은 하루도 안거르고 이용 하다보니 어느새 당연한 일이 돼버렸다.

[상황에 적절한 형상 관리 프로세스 설계하기] , [깃헙 마케팅 효과적으로 하기]

이런 심화적인 기술만 관심을 갖는 내 자신이 건방져 보이기도 하여

github 시스템부터 제대로 알고 있는지 자문해보기로 했다.


원격 저장소 (Local Repository) 로컬 저장소 (Remote Repository) 스테이징 영역 (Staging Area) 작업 트리 (Working Tree)


원격 저장소
우리가 흔히 레포지토리 라고 일컫는거. 
깃허브가 기존의 소스관리 툴(CVS , SVN 등)로부터 경쟁력을 가질 수 있었던건 
원격저장소(허브) 개념이 있었기 때문이었다.
이 허브 덕에 사람들은 각자 공간과 시간에서 자유롭게 일을 할 수 있게 됐다. 
작업 트리
내가 에디터로 작업하고있는 공간(폴더/파일)_(요즘엔 코드스페이스도 있다.)_ 에서 
작업이 끝나면 `git add .` 로 깃의 저장공간 중 하나인 스테이징 영역에 집어넣는다.
이후 `git status` 로 내 작업트리와 스테이징을 비교할 수 있다.
스테이징 영역
작업폴더에는 .git이 대게 있다. 그리고   .git 안에는 많은 데이터가 들어있고, 
스테이징영역은 .git 안에 있는 데이터중 하나인 공간형 데이터다.
git add할 때 마다 이 스테이징 영역이라는 공간에 변경 된 데이터들이 들어가게 된다.

로컬 저장소

git log를  입력하면 로컬 저장소에 담긴 코드의 히스토리를 볼 수 있다.
git show 를 입력하면 지정한 커밋에 대한 변경 내역을 볼 수 있다.
git push 로 원격 저장소에 보낼 수 있다.

… 이 이상 알 필요 없어 보인다.

Link to original

Git-Flow

Git-Flow 전략

GitHub의 branch 기능을 활용해 간단하고 유연한 개발을 지원해주는 Workflow.그래서 ‘Git branch 전략’이라고도 부름.

동료간 우격싸움을 예방하는 것을 주된 목적으로 하며

효율적인 협업과 신속한 배포를 지원한다.

(뉴비 개발자들에게 마더테레사라 불리는 이고잉_생활코딩선생님께서 Github 학습 도서를 출판했는데 제목이 [지옥에서 온 Git]이다)


Like a …

프로그래밍에서 디자인패턴같은

일종의 솔루션이고 방법론이다.


How to …


Link to original

Quartz blog만들기

Quartz 선택한 이유

  • 그래프뷰 제일 큼.
  • Google Analytics 설정이 간편함. (config.toml 파일에서 Analytics 측정 ID만 수정하면 됨.)
  • sns(youtube 같은) 플랫폼과 상호작용이 쉬움

create repository use quartz template

  1. Use this template
  2. Create new repository

clone in to local - initialize

git clone < my repo >

Building my Quartz

  • build Quartz on local PC

npx quartz build --serve 3306


learn quartz

Customization


Architecture-(korean)

Quartz는 정적 사이트 생성기입니다. 어떻게 작동할까요? > 이 질문은 사용자(you!)가 명령줄에서 npx quartz build를 실행할 때 무슨 일이 일어나는지 설명하는 것으로 가장 잘 답할 수 있다.

Server process

npx quartz build 입력

npx quartz build이 입력되면, npmpackage.json파일을 통해 quartz의 bin 항목( 34 line )을 찾는다.

이 항목은 ./quartz/bootstrap-cli.mjs를 가리킨다.

bootstrap-cli.mjs의 첫번째 라인에는 npm에게 Node를 사용하여 실행하라고 알려주는 shebang 커맨드가 있다. #!shebang이라 부른다.

#!/usr/bin/env node

bootstrap-cli.mjs 실행

  • hot-reload port: --serve 3001
  • default port: 8080
  1. yargs를 사용하여 script CLI를 파싱한다.

  2. esbuild로 변환/번들링 한다.

    • esbuild-sass-plugin v2.scss 파일을 import한다.
    • client script인 .inline.ts를 브라우저에서 바로 실행 가능한 형태로 코드 변환하기 위해 esbuild 인스턴스 실행한다.
  3. build.ts(build process) 실행.

    1. output 디렉토리 초기화
    2. content 폴더의 모든 파일 검색
    3. .md , .html 파일 파싱. 128개 이상:multi-thread, 미만:single-thread
      • vfile로 읽는다.
      • text 변환 적용
      • file path 슬러그화
      • remark-parse로 markdown-parshing하고 변환한다.
      • remark-rehype로 HTML-HTML 변환하고 불필요한 contents는 필터링한다.
  4. Emitters-plugin(parsing & transform) 작동.()

    • Emitters-plugin이 static resources(e.g. external CSS, JS modules, etc.)들을 parsing하고 HTML파일을 변환-생성한다.
      • parse 단계에서 생선된 hastjsx로 변환.
      • hast-util-to-jsx-runtime으로 JSX를 정적 html로 렌더링(useState,useRffect 따위의 React/Preact 동적 기능 제외)
      • Page-Layout 조립 (quartz.layout.ts 참조)
      • Client-inline-script 조힙
      • 변환된 style 적용
      • 이 모든 로직은 quartz/components/renderPage.tsx를 참조한다.
    • 추가 최적화 작업
      • Lightning Css로 CSS 최적화. (구문을 단순화하고 vender prefix를 추가함.)
      • Script 분리
        • beforeDOMLoaded → 에 insert
        • afterDOMLoaded → 에 insert
    • Emitters-plugin이 생성한 file들을 disk에 저장한다.

Deploy

Default setting

  1. Setting up Github repository
  2. Setting up General Configuration in project
  3. Prepare Hosting Server
  1. Setting up GitHub repository
# 현재 연결된 git repository url 확인
git remote -v
 
# git repository URL my repository로 변경
git remote set-url origin https://github.com/ruukr8080/ruukr8080.github.io.git
 
# 쿼츠 업데이트를 위한 upstream 추가 
git remote add upstream https://github.com/jackyzha0/quartz.git
 
# 내 repository에 Contents를 동기화
npx quartz sync --no-pull

In future updates, you can simply run npx quartz sync every time you want to push updates to your repository.


  1. Setting up General Configuration in project

배포 전 baseUrl을 비롯한 General Configuration설정을 해야한다. 안그럼 일부 Quartz 기능(예: RSS 피드 및 사이트맵 생성)이 제대로 동작 안할 수도 있다.

  • 필수 설정 항목

    • pageTitle (site name)
    • baseUrl (github-pages url)
    • locale (한국어 = ko-KR)
  • pageTitle: 사이트의 제목. RSS 피드 생성할 때도 이 제목이 사용됨

  • pageTitleSuffix: 브라우저 탭에 보이는 페이지 제목 뒤에 붙는 텍스트. (실제 페이지 상단의 제목에는 안 보임)

  • enableSPA: SPA(Single Page Application) 라우팅 사용할지 여부

  • enablePopovers: 프리뷰 팝업 기능 사용할지 여부

  • analytics: 어떤 분석 도구를 쓸지 설정

    • null: 분석 안 함
    • Google Analytics
    • Plausible
    • Umami
    • GoatCounter
    • Posthog
    • Tinylytics
    • Cabin
    • Microsoft Clarity
  • locale: 날짜 형식이나 국제화(i18n)에 사용되는 언어 설정

  • baseUrl: 사이트맵이나 RSS용 기본 URL github-pages라면 'ruukr8080.github.io' 이런 식으로. 'https://' 같은 프로토콜은 입력 금지

  • ignorePatterns: content 폴더에서 제외할 파일 패턴들

  • defaultDateType: 페이지에 표시할 기본 날짜 타입

    • created: 생성일
    • modified: 수정일
    • published: 발행일
  • theme: 사이트 디자인 관련 설정

    • cdnCaching: 구글 CDN 폰트 사용 여부
    • typography: 폰트 설정 (구글 폰트에서 고를 수 있음)
      • header: 제목용 폰트
      • code: 코드용 폰트
      • body: 본문용 폰트
    • colors: 색상 테마 설정
  • light: 배경색

  • lightgray: 테두리

  • gray: 그래프 링크, 굵은 테두리

  • darkgray: 본문 텍스트

  • dark: 헤더 텍스트와 아이콘

  • secondary: 링크 색상

  • tertiary: 호버 상태

  • highlight: 내부 링크 배경, 강조 텍스트

  • textHighlight: 마크다운 강조 텍스트 배경

  1. Setting up Hosting server

GitHub Pages로 할거임.

create a new file quartz/.github/workflows/deploy.yml.


deploy.yml

 
name: Deploy Quartz site to GitHub Pages
 
on:
  push:
    branches:
      - v4
 
permissions:
  contents: read
  pages: write
  id-token: write
 
concurrency:
  group: "pages"
  cancel-in-progress: false
 
jobs:
  build:
    runs-on: ubuntu-22.04
    steps:
      - uses: actions/checkout@v4
        with:
          fetch-depth: 0 # Fetch all history for git info
      - uses: actions/setup-node@v4
        with:
          node-version: 22
      - name: Install Dependencies
        run: npm ci
      - name: Build Quartz
        run: npx quartz build
      - name: Upload artifact
        uses: actions/upload-pages-artifact@v3
        with:
          path: public
 
  deploy:
    needs: build
    environment:
      name: github-pages
      url: ${{ steps.deployment.outputs.page_url }}
    runs-on: ubuntu-latest
    steps:
      - name: Deploy to GitHub Pages
        id: deployment
        uses: actions/deploy-pages@v4

Then:

Head to “Settings” tab of your forked repository and in the sidebar, click “Pages”. Under “Source”, select “GitHub Actions”. Commit these changes by doing npx quartz sync. This should deploy your site to .github.io/.


General Configuration

This part of the configuration concerns anything that can affect the whole site. The following is a list breaking down all the things you can configure:

  • pageTitle: title of the site. This is also used when generating the RSS Feed for your site.

  • pageTitleSuffix: a string added to the end of the page title. This only applies to the browser tab title, not the title shown at the top of the page.

  • enableSPA: whether to enable SPA Routing on your site.

  • enablePopovers: whether to enable popover previews on your site.

  • analytics: what to use for analytics on your site. Values can be null: don’t use analytics;

    • { provider: ‘google’, tagId: '' }: use Google Analytics;

    • { provider: ‘plausible’ } (managed) or { provider: ‘plausible’, host: '' } (self-hosted): use Plausible;

    • { provider: ‘umami’, host: '', websiteId: '' }: use Umami;

    • { provider: ‘goatcounter’, websiteId: ‘my-goatcounter-id’ } (managed) or { provider: ‘goatcounter’, websiteId: ‘my-goatcounter-id’, host: ‘my-goatcounter-domain.com’, scriptSrc: ‘https://my-url.to/counter.js’ } (self-hosted) use GoatCounter;

    • { provider: ‘posthog’, apiKey: '', host: '' }: use Posthog;

    • { provider: ‘tinylytics’, siteId: '' }: use Tinylytics;

    • { provider: ‘cabin’ } or { provider: ‘cabin’, host: ‘https://cabin.example.com’ } (custom domain): use Cabin;

    • {provider: ‘clarity’, projectId: ‘<your-clarity-id-code’ }: use Microsoft clarity. The project id can be found on top of the overview page.

  • locale: used for i18n and date formatting

  • baseUrl: this is used for sitemaps and RSS feeds that require an absolute URL to know where the canonical ‘home’ of your site lives. This is normally the deployed URL of your site (e.g. quartz.jzhao.xyz for this site). Do not include the protocol (i.e. https://) or any leading or trailing slashes.

    • This should also include the subpath if you are hosting on GitHub pages without a custom domain. For example, if my repository is jackyzha0/quartz, GitHub ages would deploy to https://jackyzha0.github.io/quartz and the baseUrl would be jackyzha0.github.io/quartz.

    • Note that Quartz 4 will avoid using this as much as possible and use relative URLs whenever it can to make sure your site works no matter where you end up actually deploying it.

  • ignorePatterns: a list of glob patterns that Quartz should ignore and not search through when looking for files inside the content folder. See private pages for more details.

  • defaultDateType: whether to use created, modified, or published as the default date to display on pages and page listings.

  • theme: configure how the site looks.

    • cdnCaching: If true (default), use Google CDN to cache the fonts. This will generally will be faster. Disable (false) this if you want Quartz to download the fonts to be self-contained.

    • typography: what fonts to use. Any font available on Google Fonts works here.

      • header: Font to use for headers

      • code: Font for inline and block quotes.

      • body: Font for everything

    • colors: controls the theming of the site.

      • light: page background

      • lightgray: borders

      • gray: graph links, heavier borders

      • darkgray: body text

      • dark: header text and icons

      • secondary: link colour, current graph node

      • tertiary: hover states and visited graph nodes

      • highlight: internal link background, highlighted text, highlighted lines of code

      • textHighlight: markdown highlighted text background


리로드 문제 발생

layout을 변경하고싶은데, 서버를 껏다켜야만 변경사항이 적용됐다.

package.json에서 npx quartz build --serve가 어떻게 돌아가는지는 위에서 학습했다.

파싱 된 커맨드 파일인 bootstrap-cli.mjs 에서 확인해보니

Contents 만 감지하고 레이아웃은 감지 안한다.

그래서 해결 방법으로 nodemon을 인스톨하고 "scripts": 내부에 새로운 커맨드라인을 생성 해줬다.

//linux
"dev": "nodemon --watch quartz.layout.ts --watch quartz.config.ts --ext ts,tsx,scss --exec 'npx quartz build --serve'"
//window
"dev": "nodemon --watch quartz.layout.ts --watch quartz.config.ts --ext ts,tsx,scss --exec \"npx quartz build --serve\""

리로드 문제 조사

  • Quartz 커뮤니티{ 디스코드 } 에 리로드 관련돼서 징징거리는 유저 발견.
  • Quartz 깃허브 최근 커밋 내역 보니 리로드 관련 커밋메세지가 많음.

리로드 문제 해결

새로 Watch 스크립트 파일 하나 만들기

  1. project의 root 폴더에 새로 watch.config.js 파일 생성.
export const watchTargets = [
  "quartz/styles",
  // "quartz/styles/**/*scss",
  // "testDir/*.ts",
  // "*.js",
  // "**/*.md"
]

  1. quartz/cli/handler.js/ handler.js 파일에 import 해준다.
    1. import { watchTargets } from ”../../watch.config.js”
    2. chokidar.watch()- 431번 line에 메서드 추가

고치기 힘들어보이면 새로 만들어라.


Link to original

부끄러움 많은 생애를 보내 왔습니다.

🙊main/master 브랜치

이 브런치에 push로 접하는 순간은

상견례 자리쯤으로 여기자.


🙊커밋 메세지

좋은 예👍

feat: Add login validation
fix: Resolve infinite loading issue
docs: Update README installation guide

예?😭

"test1" 
"ㅋ",
"asd"
(실무 팀프로젝트에서 커밋 메세지 이런식으로 쓰면 mz소리 들음)

커밋메세지는 진지하게 써야하는거다. 어떻게 쓰는지 모르겠다면 커밋컨벤션이라는게 있으니 찾아보면 된다.


🙊('.gitignore' 생성) 까지가 'git init'이다

  • 짜증나는 상황 : 허브에서 clone 혹은 pull 받는데 오래걸림 node_module올라와 있음.
  • ㅈ된 상황 : 허브에 게시되면 안될게 올라와있음. APIkey,env,secetkey 올라와 있음.

‘.gitignore’로 예방하고 광명찾자.

// .gitignore파일
node_modules/
.env
.DS_Store
dist/
build/
*.log

🙊작업 시작 하기 전엔 'gitupdate' , 'git pull' 하고 시작하자. + push force는 '로우리턴하이리스크'다.

상황.

시간 : 00시 03분

- 버스 막차 : [00:10]
- 작업 상황 : 내 파트 완료
- commit 갯수: 중간 중간 커밋하면서 작업 해서 10개 넘음
- pulls: 0개 (치명적)
git add . 
git commit -m "aaaaa" 
git push origin main
.
.
! [rejected] feature/complete -> feature/complete 
(fetch first) error: failed to push some refs to...
.
.
git pull origin main
.
.
(충돌 300개 발견됐다는 로그들)

시간 : 00시 07분

- 구글링 : "error: failed to push some refs to..." 
- 스택오버플로우 : "u can input "git push -f" bro, but you must ..."
git push -f origin main
.
.
Resolving deltas: 100% (300/300). done.
- 팀장님이 쓴 hotfix 날라감
- 동료들 작업 내역 날라감

시간 : 00시 04분

퇴근 

Link to original